

“PF tek”[i] is a mushroom-growing technique developed by a grower who used the nick-name Psilocybe Fantasticus, or PF for short. Although it’s not the highest-yielding method available, it is among the most reliable—and it’s simple enough that beginners can almost always realize a harvest. Plus, the tek requires only commonly available supplies, and no specialized equipment is necessary. PF tek is very popular among Psilocybe growers (that’s the vaunted “magic mushroom”), but will also work with any legal, culinary mushroom able to grow on grain.
Some examples of mushrooms that can be grown with PF tek include:
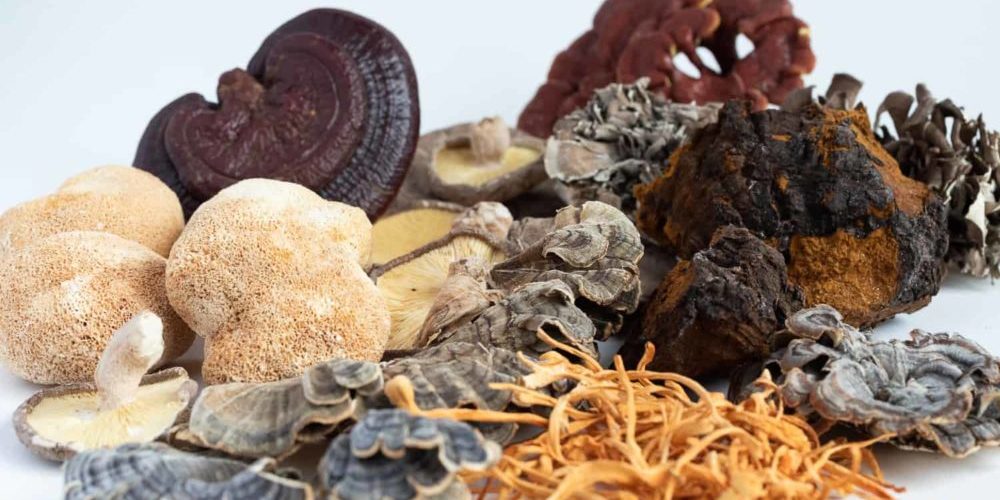
- Psilocybe cubensis and some other psilocybin-containing species
- Lion’s Mane (Hericium erinaceus)
- Shaggy Mane (Coprinus comatus)
- Several of the oyster mushrooms (Pleurotus sp.)
Once a grower has become comfortable using PF tek, graduating to higher-yield methods or methods that work for species that don’t like grain will be much easier, since some of the steps are the same.
Although PF tek is very simple, it’s not always described that way. Because the method is so popular, many people have developed variations on the tek, plus even in the original version there is some room to choose among different options. Internet fora on mushroom-growing therefore tend to fill up with intricate discussions of all sorts of minutia such that a novice grower can easily get confused and overwhelmed.
What follows is, instead, a simple, basic description. Once a beginner becomes familiar with the basic outline of the tek, conversations with more experienced growers about all the details and options will make a lot more sense. If you’re already experienced with PF Tek you might want to look into WBS Tek which is a bit more complicated but tends to yield more. There is also other options such as Dub Tub Tek.

Growing With PF Tek
The basic idea is that you grow your chosen fungus in jars filled with a mixture of brown rice flour, vermiculite, and water. Once the fungus has fully colonized the mixture, the contents of the jar can be slid out easily, held together in a block or cake by the fungal mycelium. Then you dunk the cake in water and then place it in a fruiting chamber (Like a monotub fruiting chamber or a shotgun fruiting chamber) where the humidity can be controlled. Before long, the cake will sprout mushrooms. The same cake can usually be take through three fruiting cycles before it starts to run out of nutrients.
The basic recipe is as follows[ii]:
- Two parts vermiculite
- One part brown rice flour
- One part water
Plus the mushroom spores, of course.
PF Tek: Step by Step
Before beginning, it’s important to assemble all necessarily materials and equipment. It doesn’t do to get halfway through and realize some important component is missing!
Necessary supplies include:
- Vermiculite, usually available by the bag in garden supply shops and pet supply shops. Its function here is to hold both water and air. This is the Vermiculite I use.
- Brown rice flour, often available by the bag in grocery stories or health food stores. Alternatively, you can buy brown rice and grind it in grinder. Its function is to feed the growing fungus. Any of these brands of Brown Rice Flour will do you fine.
- Water. I use distilled water as tap water as chlorine and other chemicals that can hinder the mushroom growing process. Any distilled water will do.
- A syringe of spores in water. Choose a spore of your desired Mushroom you wish to grow.
- Half-pint canning jars with lids and a mouth as wide or wider than the rest of the jar—so the cake can slide out easily. See my favorite mushroom jars here.
- Aluminum foil to cover the lids of the jars. Any foil will do.
- A large pot or pressure-cooker. This is the pressure cooker I use.
- A hammer and a nail.
- A source of flame, such as a cigarette lighter.
- A properly-constructed shotgun fruiting chamber, basically a plastic tub with a lid and some air-holes (these look a bit like a shotgun blast, hence the name) cut in the side. Instructions for building one are available online
- An incubator, can be either a simple cabinet or a specially constructed heated box, provided the temperature can be controlled
- A clean place to work with minimal airflow, may be a specialized box or hood, but a clean, enclosed room works, too.
Step 1: Mix the Substrate
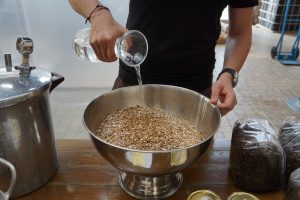
Mix the vermiculite and water so that the vermiculite is fully saturated but does not drip much. Then add the brown rice flour and mix thoroughly so that each piece of vermiculite is coated with flour. Having the correct amount of moisture in the mix is called “field capacity,” and getting it right is important for a good grow.
The batch can be as big or as small as you want—one jar’s worth or fifty jars’ worth—provided the ratio of the ingredients is correct and you have enough jars and fruiting chambers and so forth.
Step 2: Fill and Cap the Jars
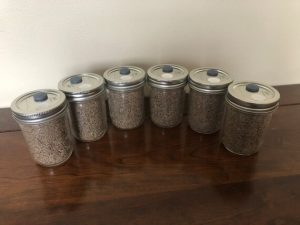
Fill the jars with substrate, but be careful to leave ½ inch of room at the top. Do not tap down or tamp down the substrate. Leave it very loose in the jar so the mycelium will have plenty of air pockets. Make sure the part of the jar above the level of the substrate is clean, with no bits or residue of substrate clinging to it—otherwise, contaminants that make it into the jar during incubation could follow the trail of the clinging bits of food into the developing cake and ruin the grow. Once the upper part of the jars are clean, top them off with a little dry vermiculite.
Use the hammer and nail to poke four holes in each lid near the edge. The holes have to be bigger than the needle of the syringe. Then cover the holes with masking tape or micropore tape.
Cap the filled jars, then cover the top of each jar with aluminum foil. The foil is to keep any water from getting in through the holes during sterilization.
Step 3: Sterilize the Jars
Sterilize the jars and their contents by giving them a steam-bath for an hour and a half. Use something in the bottom of the pot to keep the jars out of the water. To prevent breakage, be careful not to heat them up too quickly and to let them cool slowly by leaving them in the steamer until it cools fully. During steaming, add extra water as needed so the pot doesn’t run dry.
You can also use a pressure cooker for 45 minutes at 15 psi instead of a steam-bath, if you prefer.
Step 4: Inoculate the Jars
Once the jars are cool (if the substrate is too hot during inoculation, it will kill the spores), sterilize the syringe needle by heating it red-hot in a flame, allow it to cool and then inject the spore solution into the jars through the holes in the lids (leave the lids on!). Inject a little through each hole, angling the needle so the spore solution ends up squirting on the inside of the glass. This way, the growing mycelium will be visible as soon as possible and you can stop worrying about whether your spores germinated.
This is the step that must be conducted in a clean air with little to no air movement, to minimize the change that airborne contaminants could cling to the needle and be introduced to the substrate.
Step 5: Incubate the Jars
Incubating the jars means letting them sit in a warm, dark place as the mycelium colonizes the substrate. The temperature range depends on the species—or even the variety—you want to grow. The incubation time also depends on the species and variety. Once the substrate looks entirely colonized, wait a little longer to give the mycelium time to reach the very center of the jars.
Step 6: Birth the Cakes
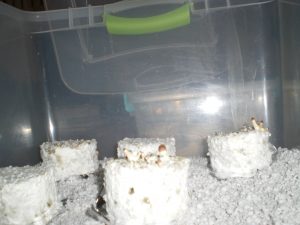
Once the substrate is fully colonized, “birth” the cakes. That is, slide them out of the jars. A little tap on the bottom should do it.
Step 7: Dunk and Roll
Once each cake it out, rinse it off and then soak it in cold water for about 20 hours. Then take it out of the water and roll it in dry vermiculite to coat it. The cold water not only gives the mycelium a good drink, it also stimulates fruiting (like an autumn rain).
Step 8: Into the Fruiting Chamber
Place one or more cakes into the fruiting chamber. They should not be crowded, so you may need multiple fruiting chambers if you have a big batch. Once they’re inside, you will have to control temperature and humidity quite closely. Some people invest in thermometers and hygrometers. Others just learn to estimate.
Step 9: Harvest Mushrooms
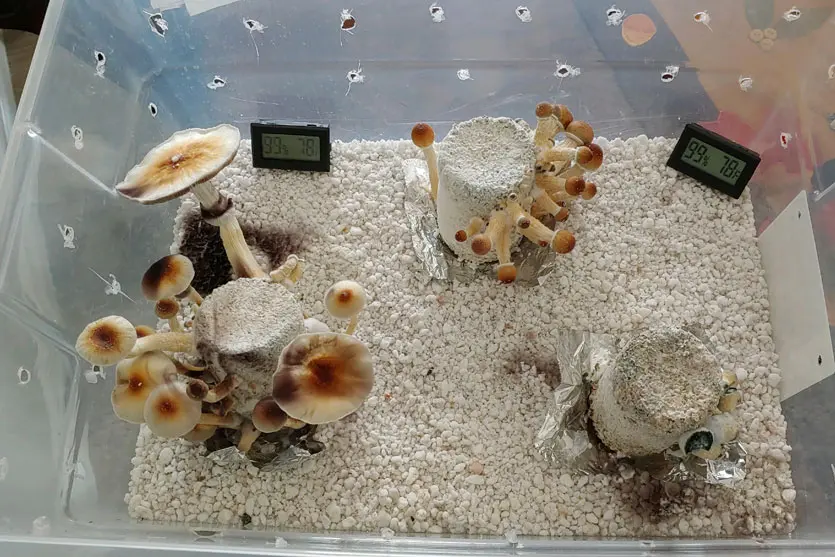
Harvest the mushrooms either by twisting and pulling or with a knife or a pair of scissors. It’s important to harvest ALL of the mushrooms, even the teeny-tiny ones that didn’t fully develop, before starting a new fruiting cycle with the same cake.
FAQ
PF Tek Yield
The yield depends on the species and variety of mushroom you grow. Usually, yield is somewhat lower with PF tek than with other methods, but total failure is unlikely.
How Long Does PF Tek Take From Start to Finish?
Colonization time and fruiting time both depend on what you’re growing, but the process often takes about a month total. It can be longer or shorter, though.
What Is the Best PF Tek Substrate?
The basic PF tek substrate is a mixture of brown rice flour and vermiculite, but flours made from other grains, such as rye or millet, can work, too, and the vermiculite can be replaced with other materials, such as coco coir.
How Do I Know if My PF Tek Jars Are Contaminated?
Contamination is usually visible as weird colors in the jar, or there may be a noticeably bad odor. Once the substrate is fully colonized, contamination becomes much less of a concern as there isn’t room for the contaminants to grow.
What are the Best PF Tek Jars?
Small canning jars work very well, provided the mouths are the widest part—the cake can’t come out intact if the top is narrower than the cake! Drinking glasses of appropriate size work well, too, though in that case you’ll have to improvise a lid.
Do I Need a Pressure Cooker for PF Tek?
The sterilization stage is an absolute necessity, but the pressure cooker is not, provided you use brown rice flour as your grain in the substrate. Just steam the jars instead. However, other grains require higher temperatures to sterilize properly, so for them you do need a pressure cooker.
References:
[i] (2021). PF-Tek for Simple Minds. Fungifun
[ii] Ziran (2017). Updated PF Tek Guide. Shroomery
Thanks, this is an awesome guide. Just found one problem when I got to inoculating my jars. When filling the jars you need to fill it to the absolute top. The half inch of dry vermiculite needs to end at the very brim of the jar. There should be no space between the lid and the substrate otherwise the syringe needle doesn’t reach through the the dry vermiculite to the brown rice flower/vermiculite mix and the spores just sort of pool at the top. My question is: can I reuse the un-inoculated mix to re-pack and sterilize the jars
If half an inch of vermiculite is too much for your needle to bypass, then you need a longer needle (should be around an inch long, 18 gauge). I used PF tek successfully many times 15-20 years ago – the way the jar filling is described is absolutely correct and necessary to prevent contaminating organisms from getting down into your substrate. Pooled spores from a shallow injection should still form mycelium, though it may take a little longer to see full colonization.
Really informative article thanks Austin. I’m in the process of building a SGFC and will be sure to give the PF Tek. Mush Love 🙂
Thanks James! Good luck!
I’m having issues with getting all of my jars to properly develop mycellium once inoculated. I am running 72 jars at a time (6 per tray, 12 trays) and probably 12 jars will have fully developed in the 3 weeks since my inoculation of spores — so the VBGW (Verm/Rice/Gypsum/Water) mixture is OK, the spores I’m using are OK, and the chamber I’m using is OK (it’s a big ass Igloo cooler with a heat pad on the bottom that is insulated to make sure it doesn’t get the bottom row of jars too hot, and I have a temp control on it). Most of the jars have simply dissolved into a wet mess of mixture with no growth at all — and some places I see partial development of mycellium at the injection points that stalled. Is there some sort of bacteria that is clinging to the needle and developing so fast that it stalls out any chance by the spores to develop? I have NOT yet resorted to flaming the needle but my next batch that I injected all got the iso rubdown treatment before being inserted into each and every hole in each of the 72 jars in that new batch, and it’s too early to tell if there will be good growth or no growth. I had great success in a prior attempt with B+ spores (all 96 jars developed in full) so I’m wondering if the strain (Air Force One from premiumspores) might be the issue — I have yet to get a LOT of my jars to develop from them.
My biggest challenge is green mold appearing on the cakes after 1 week in the fruiting chamber. What steps do I take to limit this?