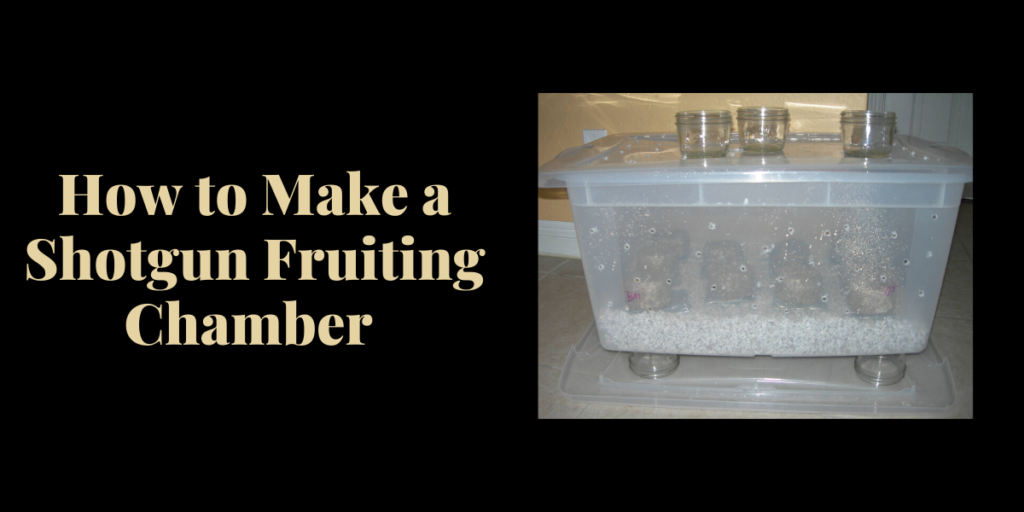
A shotgun fruiting chamber[i] (usually abbreviated to SGFC) is a container meant to keep a fruiting block from drying out while also providing good air exchange. The name comes from the many small ventilation holes that look a little like someone blasted the chamber with a shotgun. An SGFC requires some knowledge and attention to use properly, but the chamber itself is easily to build and requires no specialized materials or equipment.
An SGFC may look like a monotub to a casual glance, and indeed the same type of tub could be used to make either, but the two function very differently[ii]. The different functions dictate the differences in design.
Monotub tek is a simple, relatively low-maintenance way of producing a large crop from beginning to end. To that end, the lower part of the chamber is filled with substrate that is then mixed with spawn. The air-holes are filtered, to prevent contamination before the mycelium has completely colonized the substrate. It’s a good option for beginners or for professionals starting to ramp up production.
In contrast, with an SGFC, the bottom of the chamber is not filled with substrate but with damp perlite; a fruiting block rests on the perlite. The idea is that fresh air enters the container from the bottom and is humidified as it comes up through the damp perlite. Because the fruiting block is already fully colonized when placed in the chamber, the air holes don’t need to be filtered. Yield is not necessarily any better than from a mushroom-growing kit, but it is more reliable; the purpose of the chamber is to give more experienced growers more precise control over growing conditions. Grow chambers are great because they are reuseable, where other methods like using mushroom grow bags are one-time use only. The Shotgun Fruiting Chamber is popular method to grow shrooms but if you don’t think it’s for you check out other methods like PF Tek, Monotub Tek, Dub Tub Tek or WBS Tek.
Building a Shotgun Fruiting Chamber
A SGFC doesn’t need any specialized or hard-to-find materials or tools; most growers probably have most of what is needed already.
Materials Needed
- One clear, plastic tote with a lid (roughly 70 quart capacity; 10 to 15 inches tall)
- Coarse perlite (between 10 and 12 quarts)
- A step stool to set the chamber on (four soup cans will do)
Tools Needed
- A power drill with a ¼ inch bit
- A measuring tape
- A Sharpie marker
- A spray bottle
- A hygrometer with a probe.
Step by Step Instructions
It’s best to follow the steps exactly; growers inexperienced with the method are not likely to come up with improvements over the tried-and-true.
Step 1. Mark Locations for the Holes
The holes have to be evenly-spaced across all six sides of the tote—including the top and bottom. Try an even grid with two inches between each hole. Measure the grid with the measuring tape and mark the planned location of each hole with a marker.
Step 2. Drill Holes
Use a ¼ inch drill bit. Do not push too hard while drilling or the plastic of the tote could crack. Once the holes are drilled, poke something through each one to knock out any plastic shards clinging to the edges.
Step 3. Fill with Perlite
Rinse the perlite in order to remove dust that could clog the holes, then soak it and cover the bottom of the tote with an even layer a few inches deep; the exact depth of the layer is not important provided there is at least five inches of open space above the perlite in the tote to allow for proper air circulation.
Step 4. Put the Fruiting Block in the Chamber
It might be tempting to place multiple blocks, or a single very large block, in the same chamber, but part of the point of the design is to provide plenty of airflow around the block. Placing a hygrometer in the chamber is not optional, but a good idea; make sure the hygrometer can register 90% humidity, as not all of them can. A fan, on the other hand, is not only unnecessary, it would also be counterproductive.
Step 5. Set the Chamber up on “Legs”
Air has to be able to come up through the floor of the chamber, through the perlite, so the chamber can’t sit flat on a table or the floor. It must be elevated at least a few inches. Four shot glasses make adequate improvised legs, as would soup cans, large toy blocks, or anything else sturdy and of the right size. The easiest and safest thing to use is of course a step stool.
How to Use a Shotgun Fruiting Chamber
Shotgun fruiting chambers are not low-maintenance. They require careful attention several times a day in order to work, and the details vary depending on the grower’s climate and other circumstances. Note that the following is not a detailed how-to on growing mushrooms but simply an exploration of how an SGFC works as a tool—its controls, as it were.
Spraying and Fanning
Use the spray bottle to mist several times per day—how often will depend on the climate and on the growth stage of the fungus. A good hygrometer will make it easier to tell when to mist, although some growers judge by the appearance of the block.
Growers differ on whether the block itself should be sprayed or only the perlite. The consensus seems to be that the walls should not be sprayed at all. The perlite should not be allowed to dry, since its function is to humidify incoming air, which in turn keeps the block from drying out. The block will stay adequately moisturized without spraying, but some growers maintain that excess moisture evaporating off the block stimulates pin formation—in which case the chamber must be fanned right after spraying, or the air inside will be too humid to allow evaporation.
Fanning simply means removing the chamber lid and waving it at the inside of the chamber perhaps two times to get the air moving. The other function of fanning is to freshen the air—because fungi breathe just as animals do, enclosed grow chambers gradually fill up with carbon dioxide and run out of oxygen. The air-holes help, but might not let in enough fresh air by themselves.
Do not use an actual fan, since continual air movement will dry out the block too much; hand-fanning a few times a day is enough.
Lighting
The SGFC should be placed out of direct sunlight, but with adequate indirect light. The mycelium can grow perfectly well in the dark, but without light will not fruit—if left in the dark, the fungus will assume it hasn’t reached the surface of the fruiting block yet. Direct light, however, will heat up the fruiting chamber and dry it out.
If indirect sunlight is not available, artificial light will do, provided that it doesn’t heat up the chamber; an LED lamp will work nicely. Growers differ on how many hours per day the light must be on and whether a dark period is actually necessary. 12 hours on, 12 hours off is a good default schedule.


Afternoon,
I just wanted to be clear about step #4. I most likely will go with this method as I am new to all of this. My question is, do I need one chamber per cake? Or can I place a few (2) at a time in one chamber? I tried looking at the photo closer and it looked like more then one cake was inside the tub.
Thank you
You can put multiple cakes in a chamber.
Thanks for this. How often do I need to replace the perlite?
I usually wait until all my cakes have finished flushing and won’t produce any more then I take out the perlite and soak it overnight in a weak bleach solution. I rinse it lots the next day. It’s then ready to put straight back in. I use the same perlite over and over for aaaaaages.