There are certain stages in mushroom cultivation when the risk of contamination is a real problem. Working with germinating spores or mycelium samples on agar, for example, is very dicey, as is anything that involves handling grain spawn that has been inoculated but has not fully colonized. Many mushroom-growing teks avoid such high-risk situations, but people engaged in mushroom-breeding or in cloning new mycelium from fruiting bodies don’t have that luxury. That’s when sterile working conditions become absolutely necessary.
A still-air box (or SAB) is one tool in the fight against contamination. These can be bought ready-made, but it’s not difficult to make your own. There are a couple of good methods[i][ii].
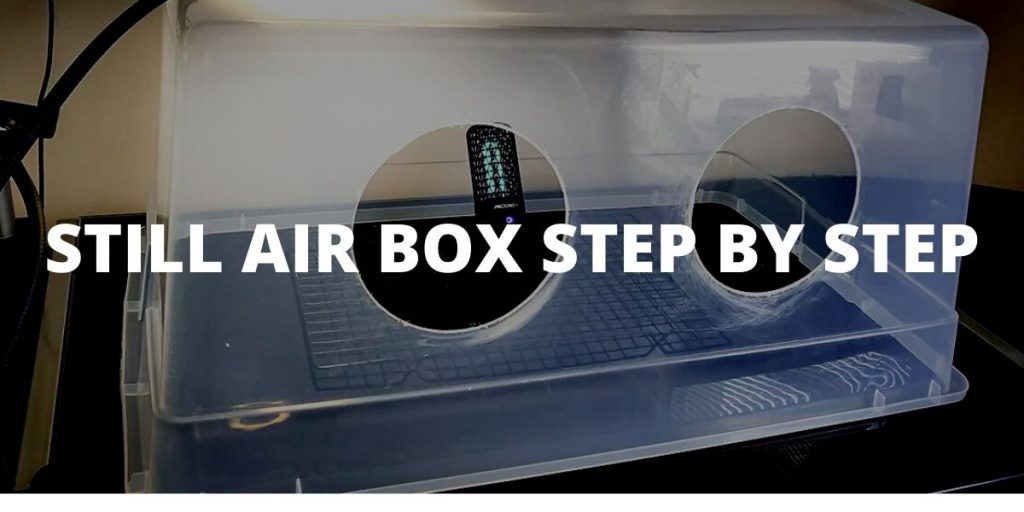
What is a Still Air Box?
A still-air box is a clear container the user can put a project (like a group of agar plates to be inoculated) inside of and then reach into and work. The box is meant to solve a very specific problem; even after you and every object and surface you need has been thoroughly cleaned and disinfected, a tiny puff of air could bring in bacteria or mold or some other problem and drop it into the middle of your project. Still-air boxes block that puff of air from moving into your work-space, thus dramatically reducing the chance of contamination.

What isn’t a Still Air Box
It’s possible to confuse still-air boxes with several other mushroom-growing tools. For example, a still-air box is not a sterile room; you do not get bodily into the box. Only your work and your hands go in. A still-air box is for when you can’t set up a sterile room, or for when you don’t trust your sterile room to be completely sterile.
An SAB is also not a glove box. A glove box is also a container for sensitive work, but the holes you reach in through have gloves permanently attached to them. You put your hands in the cloves in order to work inside the box, but the seal between the gloves and the rims of the holes keeps all air out. Once you put something in a glove box and close it, there is no more air exchange until you are ready to remove your project from the box. An SAB, in contrast, allows air exchange through the arm-holes—it’s not sealed. But by blocking stray breezes (even the tiny, imperceptible breezes that occur indoors), it reduces the chance of contaminants coming in on the air.
A glove box is more secure, and some mushroom cultivators use them, but it’s not considered necessary, and working in gloves that are attached to a box can be difficult.
And an SAB is not a laminar flow hood[iii], although these, too, are sometimes by mushroom-growers to protect against contamination, mostly look like boxes, and can be made at home. “Laminar flow” means air moving steadily, without turbulence. There are two ways laminar flow hoods can work. If somebody wants to work on something that produces dangerous fumes or particulates, they can use a laminar flow hood that draws air gently inward, past the worker, into the hood, and then into a filter before releasing the air out the back. Since the flow is laminar, only going in one direction with no turbulent backflow at all, the fumes and such go only through the filter and never into the face of the worker. Alternatively, to avoid contamination of, say, an agar plate by mold spores or whatever else, use a laminar flow hood that goes the other way, gently blowing filtered air across the workspace.
Although an SAB and a laminar flow hood seem to be opposites, the one making air still and the other making it move, they both work on the same principle of controlling air movement rather than sealing off a workspace as a glove box does.
How to Build a Still Air Box
Materials Needed
A basic SAB requires very few “ingredients,” and is extremely simple to make.
- A large, clear plastic box with a lid that can fit air-tight—generally, the larger and the clearer the better. This is the box I use, its’ high quality, air tight and has latches.
- An empty metal can that is just wider than your arm.
- A hot-plate or similar flat, self-heating device. I use this induction cook top.
- An oven mitt. Anything will do.
- A Sharpie. Anything will do.
- A file. Again, don’t be picky. Anything works.
- A raised grate or screen that can fit inside the box and keep items off the bottom. I use a fire pit grate that has legs.
Alternatively, you can dispense with the can and the hot-plate and use a drill with a hole-saw attachment that is just wider than your arm. In that case, you will also need a small, sharp knife.
Step by Step Instructions
- Turn the box on its side so the bottom is facing you and the opening where the lid goes is facing away—henceforth, the bottom of the plastic box will be the front of the SAB.
- Mark the location of the arm-holes by tracing the can with the Sharpie (twice!). The arm-holes should be low-down so that when you reach your arms in to work, you’ll be able to rest your elbows on the table
- Turn on the hot-plate and let it come up to temperature
- Remove the label from the empty can and place it, open side down, on the hot plate.
- When the rim of the can is nice and hot, pick it up with the oven mitt and press the rim against the plastic at one of the marked arm-holes, twisting it as you press. The hot metal will melt the plastic, and you’ll be able to pop the circle of plastic out, leaving the hole. Repeat for the second hole. Avoid breathing fumes from melting plastic.
- Use the file to smooth the edges of the holes, if needed. You don’t want sharp plastic edges cutting your arms or snagging on your gloves.
- Place the grate inside the box and close the lid.
Using the hot-can method has a lot of advantages over cutting the arm-holes with a knife or saw: the plastic is less likely to crack; the opening will be less jagged, requiring less trimming; and the hot can makes no noise (useful, if you want to do something with your SAB that requires discretion). But it’s possible you don’t have a hot-plate or suitable equivalent and do have a drill with a nice hole-saw attachment.
In that case, make sure to use the saw safely. Use eye protection. Do not touch the saw while it is still attacked to the drill; to remove the plastic circle from the saw, either use an appropriate tool or remove the saw from the drill first. Use the knife to trim away any jagged plastic from the hole, then file the edge smooth as before.
However you make the holes, they should be only just large enough to comfortably admit your arms. Do not use tape inside the box or arm-holes, as it’s difficult to clean.
Design Considerations
One thing I’d do on my next build is that I’d add a rubber gasket to the hold edges. even when filed down they can end up being sharp. I ended up using duct tape but it doesnt look great and kind of stick to my arms. I’d make the holes a bit bigger and install some rubber weather stripping like this.
How to Use a Still-Air Box
How to use a still-air box is as important as how to make one.
- Clean the interior of the box.
- Clean all the materials you will need to work with in the box—sterilize those that should be sterilized. Wash your own hands and arms well and otherwise clean yourself.
- Place all your materials in the box and close the lid. Wait some minutes to let the air inside settle and to give any contaminants a chance to settle out and land on the bottom, under the grating, where they will hopefully stay.
- Reach in through the arm-holes and do your work. Try to only reach in once per work-session—don’t take your hands out until you are done. Movement in and out of the arm-holes can cause air currents and defeat the point of the SAB. A properly-designed box should be comfortable to work with; you should not be tempted to rush, nor should you be distracted from your work by your arms falling asleep or anything similar.
Frequently Asked Questions (FAQ)
Can I Flame Inside a Still Air Box?
If your SAB is large enough and it isn’t full of alcohol fumes, it’s fine to use small flames inside the box. However, any work that requires a large, hot flame should be done outside to avoid risk of melting a hole in the box.
How do I clean a Still Air Box?
Many people like to spray the interior with soap on the assumption (which could be correct, but to our knowledge has not yet been tested) that any airborne contaminants will stick to the soap film. Some people spray with alcohol, though this could make using flame inside the box dangerous—by definition, a SAB has poor ventilation. Do not use any kind of disinfectant that could also damage the fungus you want to grow.
Can I use a Still Air Box without Gloves?
Some people use gloves, others do not. Bear in mind that gloves are not automatically sterile, and that a dirty glove is as bad as a dirty hand. If you use gloves, either use fresh surgical gloves that come pre-sterilized, or sterilize your gloves yourself. If you’re going to use them, put them on now.