Have you ever built a Martha Tent?
If you just thought “have I ever what a what?” Don’t worry, we can explain!
A Martha tent is a mushroom fruiting chamber midway in size between, say, a shotgun fruiting chamber (which is typically made from a plastic tote) and a full, walk-in grow-room. Picture a free-standing linen closet, and you’ll get the idea.
It’s called a Martha because some of the earliest designs involved a shelving system sold by Martha Stewart, but there are many different designs out there now, and most have nothing to do with Ms. Stewart at all. Still, the name has stuck. Basically, you take one of those mini-greenhouses made of a metal frame and a plastic cover, install a humidifier and a fan and maybe some kind of heater, and there you go.
The reason to use a Martha rather than something you make out of a tote, is that greater size makes it possible to fruit multiple cakes or bags at the same time. You can either get a much larger harvest of one species or variety, or you can do several kinds at once, provided they all have compatible needs as far as fruiting environments go. Marthas are a particularly good option for someone who wants to start selling culinary mushrooms (these require larger minimum crop sizes than magic mushrooms because serving sizes are larger) but isn’t ready for a full grow-room yet.
Marthas are used just like other fruiting chambers. These chambers are not intended to be sterile places (like a Still Air Box, Laminar Flow Hood or a Glove Box) because once the block or bag or jar of substrate is fully colonized by the mycelium, the fungus can defend its turf fairly well, and the risk of contamination is minimal. Rather than protecting the fungus, the grower’s emphasis must shift to maintaining proper fruiting conditions—the right temperature, humidity, oxygen level, and light level for the fungus to not only thrive but produce mushrooms. Marthas are designed to directly control humidity and oxygen levels. Light and temperature depend simply on where you put the Martha when you’re ready for her to go to work.
OK, now, let’s do this.

How to Build a Martha Tent: The DIY
Materials
Note: The specific items we’ve linked to here are our recommended choices, other products may be suitable but are not recommended.
Grow Tent: Pure Garden 4 Tier
Fan: AC Infinity CLOUDLINE T6
Ultrasonic Humidifier: Everlasting Comfort Ultrasonic Cool Mist Humidifier
Humidity Controller: WILLHI WH1436H 110V Digital Air Humidity Controller
Hose Clamps: EesTeck 4″ Duct Clamps
Fan Filters: USA LGM MERV
Drip Trey: Midwest Homes Drip Trey
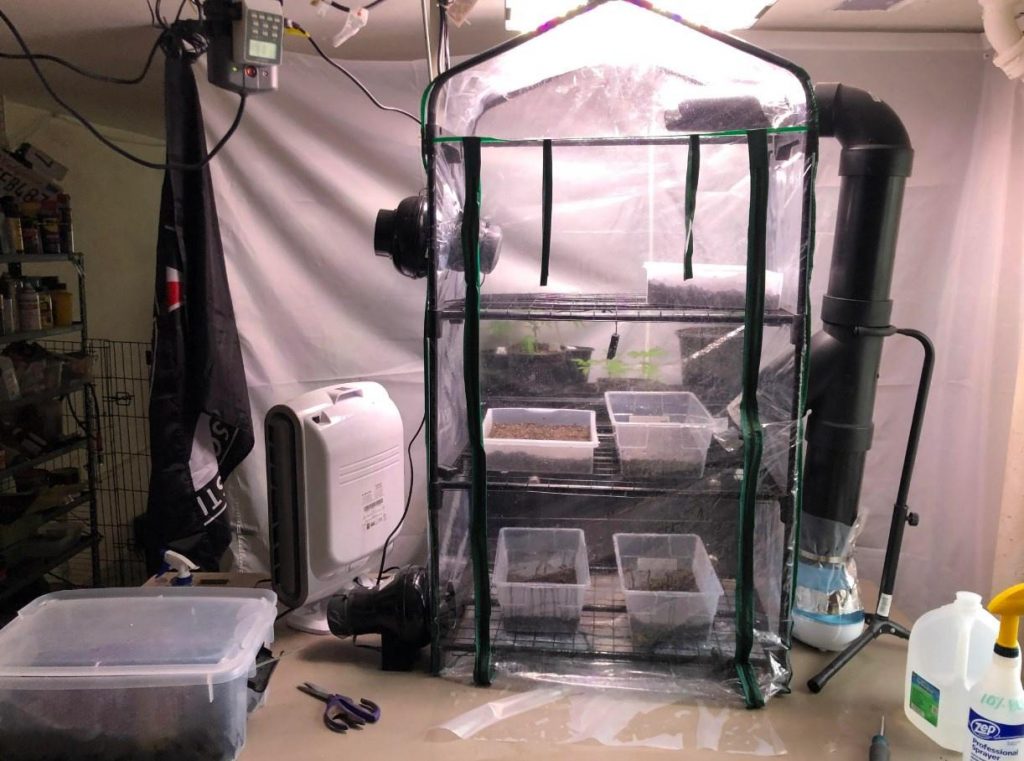
Step 1. Assemble the Grow Tent
Grow tents consist of a metal frame, a series of wire mesh shelves, and a clear plastic skin. They don’t come assembled. Just follow the instructions.
Step 2. Add the Drip-Tray
When in operation, your Martha will be humid and will therefore have moisture condensing on the walls and dripping down. Unless it’s really alright if the ground underneath puddles, you’ll need a drip-tray—you can improvise a drip-tray with a tarp, however, if you want.
Step 3. Bring on the Humidity
The humidification system has two parts, the humidifier itself and the controller. The humidifier goes inside the tent, on the very bottom, bellow the lowest shelf. The controller goes outside the tent but hooks up to the humidifier—the controller, as the name implies, turns the humidifier on and off in order to maintain a set humidity in the tent. As to exactly how these components hook together and how their settings work and so forth, simply follow the manufacturer’s instructions.
Make sure that no wires or electronic components will be sitting in water. The controller’s sensor is on a long wire, so you can thread the wire in through the tent and hang it from the top of the frame. Make sure it’s not directly in the outflow of the humidifier or the readings won’t reflect the humidity of the tent as a whole. Likewise, don’t put your cakes or bags directly in the outflow mist either, as they would get too wet and would block the flow to the rest of the chamber.
Note that there are multiple kinds of humidifier—you don’t have to use an ultrasonic, and there are advantages and disadvantages to each type. It’s just that ultrasonic humidifiers work well, and if you’re going to use something else, you may have to make adjustments to the rest of the design.
Step 4. Get Some Fresh Air
Although the Martha is not air-tight, airflow is limited in order to keep the humidity high. But if airflow is too limited, then your fungi will suffocate. Just like us, they breathe in oxygen and breath out carbon dioxide. Without enough fresh, oxygen-rich air, carbon dioxide will build up, and the fungus will start getting sick. So you need a fan in order to increase fresh air exchange—in this particular design, the fan pushes stale air out of the top of the Martha, creating a low-pressure area inside that pulls fresh air in.
There are designs that use a fan to pull fresh air in, forcing the stale air out passively, but doing it that way causes problems that ultimately require extra steps to fix or avoid.
The fan goes on the top shelf of the Martha, with its exhaust directed out through a hole you cut in the plastic sheath of the grow-tent—make sure the hole is not too big. It should fit snugly around the fan. The fan’s cord runs down the inside of the tent and then exits near the bottom with the humidifier’s cord.
Step 5. Add a Filter
This step is important if you are not planning to harvest your mushrooms before they start producing spores—and that largely depends on what species you’re growing. For example, all the various Psilocybes have a partial veil that covers the gills until the mushroom is nearly mature. Harvesting just before the veil tears is a simple and easy way to avoid getting spores all over the place, which is why growers do it that way unless they specifically want to collect spores. Oyster mushrooms, on the other hand, have no veil and start producing huge numbers of spores before they are ready for harvest. You don’t want to breathe those. If your Martha is in your house, you need a filter.
Alternatively, you could vent the fan exhaust out a window, but that requires several extra steps—and you lose the ability to open (or fully close) one of your windows.
Simply attach that filter to the exhaust end of the fan using a hose clamp.
Step 6. Find Martha a Home
If you haven’t done so already, it’s time to decide where to put your Martha. It needs to be somewhere with a temperature range that will make your fungi happy (remember that temperature preferences, like humidity level preferences, vary depending on what mushrooms you are growing) and has about twelve hours of indirect light per day (direct sunlight could make Martha too hot for your fungi). You can, of course, add heaters or even air-conditioners and lights to your set-up, but that’s usually both impractical and unnecessary. A corner of your living room is likely to do just fine, especially if you like watching your mushrooms grow.
Dealing with Common Problems
While this article is not a cultivation manual, it’s worth saying that you may have to tweak your Martha’s design and operation if your fungi tell you there is a problem. For example, you may need to add a lamp if the light level is too low, add a heating pad if the temperature is too low, or adjust the settings on your fan or your humidifier’s controller.
Here are some things to look out for.
No Growth at All
If your cakes or bags don’t even try to fruit (no pinning), that’s obviously a huge problem. Don’t rush to panic, though. Has there been enough time? Even different varieties of the same species can differ widely in the amount of time they need before they begin to fruit. But if you’re confident your grow is a dud, there are a couple of possibilities.
Conditions in the grow chamber could be wrong for your variety. While too little moisture is the more likely culprit than too much, otherwise it could be almost anything. Do some more research about what this mushroom type actually needs and make sure the conditions in your Martha are really what you think they are. Maybe something is wrong with your equipment.
Another possibility is that something went wrong before you even moved your cakes or bags into the chamber. Maybe they didn’t have enough time to completely colonize, or maybe they got contaminated with mold or bacteria. Such problems are not uncommon. Review your methods and see what you can do better.
Growth Stops After Pinning
Humidity is probably too low. Either you had your humidifier’s controller set too low from the beginning or something has gone wrong with your equipment causing the humidity to fall.
The Mushrooms Are Funny-Looking
Abnormal shapes, colors, and surface textures (cracking or fuzz, for example) could indicate a problem, but of course “abnormal” is relative. You’ll have to know what your mushrooms are supposed to look like, and what kind of variation is normal, in order to recognize a problem.
In most cases, if there is a problem, the cause is going to be too much carbon dioxide. Your fungi need more fresh air. And since there’s really no such thing as too little carbon dioxide, you really can’t go wrong by increasing fresh air exchange so long as you keep your humidity up.
But too much or too little light, too much or too little heat, too much or too little moisture, any of those could be a problem depending on exactly what’s wrong with your mushrooms.
Or maybe you simply put off harvesting a little long, and now your mushrooms are older than you’re used to seeing them. Again, don’t rush to panic.